If you’ve just installed Dynamic Grading, welcome. We built this tool to give you a different way of working with dynamics. Instead of relying on single thresholds, fixed ratios and envelopes, Dynamic Grading is based on histograms and three dynamic zones: punch, body and floor.
That might feel like a shift, especially if you’re used to traditional compressors. Here are three simple tips to help you get up to speed quickly and start using it confidently in your everyday workflow.
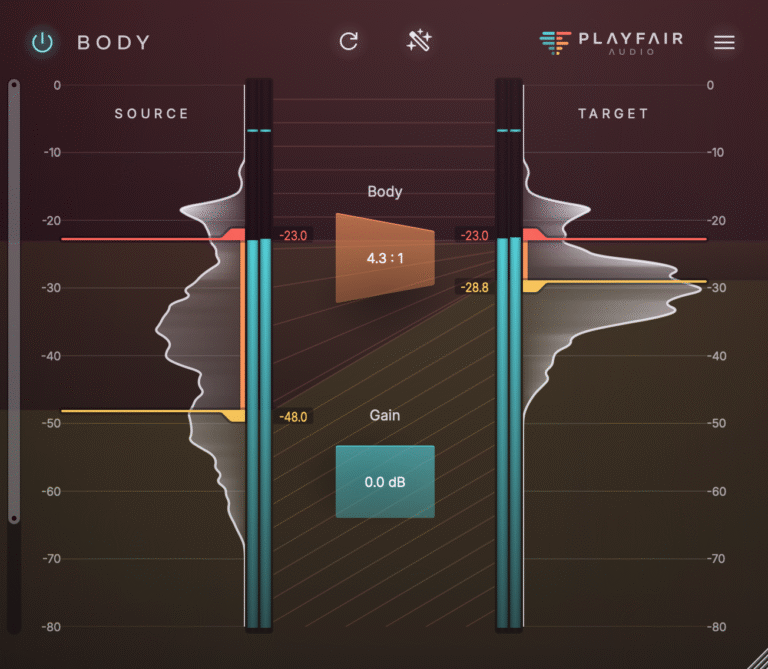
1. Learn to read the histogram
The main display in Dynamic Grading shows two histograms: one for the input signal and one for the output. These don’t show frequency content like a spectrum analyser. They show how often different intensity levels appear in your audio.
A wide histogram means the signal has a lot of dynamic variation, like a drum track with ghost notes and loud accents. A narrow one suggests the signal is already very consistent, like a sine wave or a heavily limited master.
The three markers in the centre define the body range. Everything above is the punch, everything below is the floor. These ranges give you precise control over how the signal behaves at different intensity levels.
Before making adjustments, try running some audio through the plugin and clicking the Source Learn button. This analyses the incoming signal and sets initial thresholds that usually make a good starting point. From there, you can refine by ear.
2. Start by working on the body range
The body range is often where most of the signal lives. That’s the core of a vocal, the sustain of a snare, the texture of a guitar or synth. Getting this range right can transform how a part sits in the mix.
Try compressing the body range slightly to make the signal more consistent. This can bring vocals forward, add presence to guitars, or tighten up acoustic instruments. If the part feels too constrained, try expanding the body instead to create more space and movement.
You don’t need to go overboard. Even small changes here can make a noticeable difference. Once you’ve shaped the body, you’ll often find the signal already feels more musical and controlled.
3. Use punch and floor to refine the details
Once the body is balanced, shaping the punch and floor ranges helps you dial in the final detail.
The punch range controls the highest-intensity parts of the signal. These are usually the transients or accents. If a snare feels too aggressive, compressing the punch can help push it back slightly. If it’s not cutting through, expanding the punch will make it more forward without affecting the sustain.
The floor range deals with the quietest parts, such as reverb tails, breath noise or subtle ambience. If things feel messy or cluttered, expanding the floor range can reduce unwanted detail. On the other hand, compressing it can exaggerate atmosphere and texture in creative ways.
You won’t always need to touch these zones, but they’re there when you want finer control or to solve problems that a standard compressor can’t quite reach.
Let it replace your regular compressor
Dynamic Grading isn’t a special effect. It’s designed to replace the compressor, transient shaper and expander you would normally reach for. It works well on vocals, drums, instrument groups, buses and even full mixes.
Instead of managing attack, release, ratio and make-up gain, you just define the ranges and adjust the gain in each. You get transparent, musical control with clear visual feedback and much less trial and error.
If something doesn’t sound quite right, the timing controls are there to smooth things out, and the Spectrum Control section helps fine-tune how the processor responds to different parts of the frequency spectrum. The metering helps you find the right spot quickly without second guessing.
Dynamic Grading might look different, but it solves the same problems traditional compressors try to handle. The more you use it, the more natural it feels. Once you get used to shaping dynamics this way, it’s hard to go back.
If you’re just getting started, try using it on a vocal or drum track you know well and work through each range one by one. Trust your ears, experiment a little, and you’ll soon see why we built it this way.
Try it on your next mix and see how much simpler dynamic control can be.